
🔐 How to Configure Argo Login Using Google or JumpCloud | Step-by-Step Guide
October 18, 2026 — ny_wk
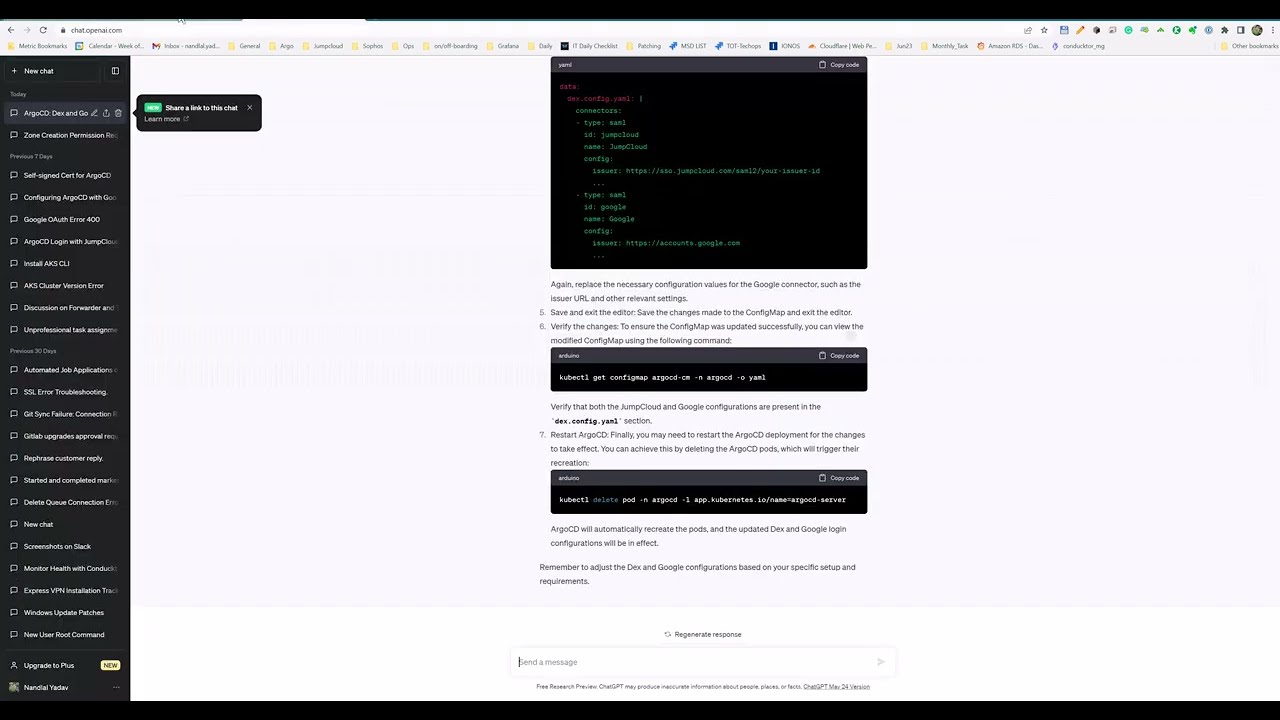
▶ 🔐 How to Configure Argo Login Using Google or JumpCloud | Step-by-Step Guide | Subscribe to @explorenystream
Streamlining access to critical applications is paramount for modern enterprises, and configuring Argo login with robust identity providers like Google or JumpCloud offers a secure and efficient solution. This comprehensive guide delves into the step-by-step process of integrating these SSO services with Argo, enhancing both security posture and user experience for your team.
In today's distributed work environments, secure and seamless access to internal tools and applications is no longer a luxury but a fundamental necessity. As organizations increasingly adopt cloud-native architectures, managing user authentication across a many services can become a complex challenge. This is particularly true for platforms like Argo, a powerful open-source suite of tools for Kubernetes, encompassing Workflows, CD, Events, and Rollouts. While Argo provides incredible flexibility and automation capabilities, ensuring secure and streamlined login for your team is crucial. This article serves as your definitive guide to configuring Argo login using two of the most popular and robust identity providers: Google SSO and JumpCloud. By integrating these services, you can leverage their advanced security features, simplify user management, and provide a frictionless authentication experience for your developers and operators.
Understanding the Need for Centralized Authentication in Argo
Before diving into the technical configurations, it's vital to grasp why centralizing Argo login through identity providers (IdPs) like Google or JumpCloud is so beneficial. Traditional methods of user authentication, often involving local accounts or basic username/password combinations, present several drawbacks in an enterprise context:
- Security Vulnerabilities: Weak passwords, credential reuse, and the lack of multi-factor authentication (MFA) expose systems to significant risks.
- Management Overhead: Creating, managing, and revoking user accounts across multiple applications is time-consuming and prone to errors.
- Poor User Experience: Users are forced to remember numerous credentials, leading to password fatigue and decreased productivity.
- Compliance Challenges: Meeting regulatory requirements often demands robust audit trails and strict access controls, which are difficult to achieve with decentralized authentication.
Single Sign-On (SSO) addresses these issues by allowing users to authenticate once with a trusted IdP and then gain access to multiple connected applications, including Argo, without re-entering their credentials. This not only enhances security through features like MFA, adaptive authentication, and centralized auditing but also significantly improves the user experience and reduces administrative burden. Both Google SSO and JumpCloud offer enterprise-grade SSO capabilities, making them excellent choices for securing your Argo deployments.
The Benefits of Integrating Google SSO with Argo
For organizations already heavily invested in the Google ecosystem (Google Workspace, Google Cloud Platform), leveraging Google SSO for Argo login is a natural and highly efficient choice. The benefits include:
- Seamless Integration: Utilizes existing Google identities, simplifying user onboarding and offboarding.
- Enhanced Security: Benefits from Google's world-class security infrastructure, including advanced MFA options and threat detection.
- Centralized User Management: Manage users and groups directly within Google Workspace, which automatically propagates to Argo.
- Cost-Effective: Often included as part of existing Google Workspace subscriptions, eliminating the need for additional identity management solutions.
Why Choose JumpCloud for Argo Authentication?
JumpCloud stands out as a comprehensive cloud directory platform that offers more than just SSO. It's an excellent option for businesses seeking a unified identity and access management (IAM) solution across diverse environments (on-premise, cloud, Windows, macOS, Linux). Key advantages of using JumpCloud for Argo login include:
- Platform Agnostic: Manages identities for a wide range of devices, applications, and network resources, not just cloud services.
- Advanced Security Features: Provides strong password policies, MFA, device trust, and conditional access policies.
- Unified Directory: Acts as the authoritative source of truth for user identities, simplifying management across your entire IT stack.
- Flexible Integration: Supports various protocols, including SAML and OIDC, making it highly adaptable for Argo and other applications.
Configuring Argo Login with Google SSO: A Step-by-Step Walkthrough
Integrating Google SSO with Argo typically involves setting up an OAuth 2.0 application in Google Cloud Platform and then configuring Argo to use this application for authentication. This process will enable users to log into Argo using their existing Google accounts.
Phase 1: Set Up an OAuth 2.0 Client in Google Cloud Platform
- Access Google Cloud Console: Navigate to the Google Cloud Console and select your project. If you don't have a project, create one.
- Enable OAuth Consent Screen:
- Go to "APIs & Services" > "OAuth consent screen".
- Choose "Internal" for organizations or "External" for broader access (though "Internal" is typical for internal Argo deployments).
- Fill in the required fields: Application name (e.g., "Argo Workflows"), User support email, and Developer contact information.
- Add "Authorized domains" that Argo will be hosted on.
- Save and continue.
- Create OAuth Client ID:
- Go to "APIs & Services" > "Credentials".
- Click "CREATE CREDENTIALS" > "OAuth client ID".
- Select "Web application" as the application type.
- Name your client (e.g., "Argo Client").
- Under "Authorized JavaScript origins", add the base URL of your Argo instance (e.g.,
https://argo.your-domain.com). - Under "Authorized redirect URIs", add the Argo callback URI. This is typically your Argo base URL followed by
/oauth2/callback(e.g.,https://argo.your-domain.com/oauth2/callback). - Click "CREATE".
- Record Client ID and Client Secret: Google will display your Client ID and Client Secret. Save these securely, as you will need them for the Argo configuration.
Phase 2: Configure Argo CD/Workflows for Google OAuth
The configuration for Argo CD and Argo Workflows (and other Argo projects) is generally similar, involving modifications to their respective Kubernetes manifests or Helm values. We'll use Argo CD as an example, but the principles apply broadly.
You'll typically modify the argocd-cm ConfigMap or the Helm chart values for Argo CD. Here's an example of the relevant section:
# argocd-cm ConfigMap example
data:
  url: https://argo.your-domain.com # Your Argo CD URL
  oidc.config: |
    name: Google
    issuer: https://accounts.google.com
    clientID: YOUR_GOOGLE_CLIENT_ID
    clientSecret: YOUR_GOOGLE_CLIENT_SECRET
    requestedScopes: ["openid", "profile", "email"]
    # For group support, if needed (requires Google Workspace admin consent)
    # requestedIDTokenClaims: {"groups": {"essential": true}}
    # Optional: If you want to restrict login to specific Google hosted domains
    # hostName: your-domain.com
Explanation of fields:
name: A descriptive name for the SSO provider (e.g., "Google").issuer: The Google OpenID Connect issuer URL (alwayshttps://accounts.google.com).clientID: The Client ID you obtained from Google Cloud Console.clientSecret: The Client Secret you obtained from Google Cloud Console.requestedScopes: Standard OIDC scopes for user identity.hostName(Optional): Restricts login to users from a specific Google Workspace domain.
After applying these changes, Argo CD should restart, and you should see a "LOGIN VIA GOOGLE" option on the Argo CD login page.
Integrating Argo with JumpCloud for Secure Login
JumpCloud offers flexible integration options, primarily through SAML 2.0 or OpenID Connect (OIDC). For Argo, OIDC is often preferred due to its simpler integration with cloud-native applications. Here's how to configure it.
Phase 1: Create an OIDC Application in JumpCloud
- Log in to JumpCloud Admin Portal: Access your JumpCloud Admin Portal.
- Navigate to SSO Applications: Go to "USER AUTHENTICATION" > "SSO".
- Add a New Application: Click the "Add new application" button and choose "Custom OIDC Application".
- Configure the Application Details:
- Display Label: A user-friendly name (e.g., "Argo Workflows SSO").
- IDP Entity ID: (Auto-generated, record this).
- SP Entity ID: This will be your Argo base URL (e.g.,
https://argo.your-domain.com). - Login URL: Your Argo base URL.
- Redirect URI: Your Argo base URL followed by
/oauth2/callback(e.g.,https://argo.your-domain.com/oauth2/callback). - Sign-on Mode: Select "Client Credentials".
- Client ID and Client Secret: JumpCloud will generate these. Record them securely.
- User Provisioning: (Optional) Configure if you want to provision users automatically from JumpCloud to Argo (Argo itself doesn't typically have a user directory for provisioning, but you might use this for related systems).
- User Attributes: Define which user attributes (e.g., email, groups) you want to send to Argo. Ensure at least
emailandgroups(if group-based access is desired) are mapped.
- Activate the Application: Assign the application to relevant JumpCloud user groups who should have access to Argo.
Phase 2: Configure Argo CD/Workflows for JumpCloud OIDC
Similar to Google SSO, you'll modify the Argo CD ConfigMap or Helm values. You'll need the Client ID, Client Secret, and Issuer URL from your JumpCloud OIDC application.
# argocd-cm ConfigMap example for JumpCloud
data:
  url: https://argo.your-domain.com # Your Argo CD URL
  oidc.config: |
    name: JumpCloud
    issuer: YOUR_JUMPCLOUD_OIDC_ISSUER_URL # Found in JumpCloud app config, usually in the format: https://oauth.jumpcloud.com/oauth2/authz
    clientID: YOUR_JUMPCLOUD_CLIENT_ID
    clientSecret: YOUR_JUMPCLOUD_CLIENT_SECRET
    requestedScopes: ["openid", "profile", "email"]
    # If using groups from JumpCloud, ensure the 'groups' claim is sent by JumpCloud
    # requestedIDTokenClaims: {"groups": {"essential": true}}
    # usernameClaim: email # Or sAMAccountName, or another unique identifier
    # groupsClaim: groups # If JumpCloud sends a 'groups' claim
Key JumpCloud specific fields:
issuer: This is critical. It's the OpenID Connect discovery endpoint for your JumpCloud application. You can usually find it in the JumpCloud OIDC application details. It often follows the patternhttps://oauth.jumpcloud.com/oauth2/authz, but verify it in your specific configuration.usernameClaim: The claim used to identify the user's username in the ID token.emailis common.groupsClaim: If JumpCloud sends group information in a specific claim (e.g., "groups"), specify it here to enable group-based role mapping in Argo.
Apply these changes, and after Argo restarts, you should see a "LOGIN VIA JUMPCLOUD" option on your Argo login page.
Post-Configuration: Role-Based Access Control (RBAC) in Argo
Once you've successfully configured SSO, the next crucial step is to implement Role-Based Access Control (RBAC) within Argo to manage user permissions. Both Argo CD and Argo Workflows support granular RBAC, allowing you to define what actions users or groups can perform.
Argo CD RBAC Example
Argo CD's RBAC is configured via the argocd-rbac-cm ConfigMap. You can map your SSO users or groups to predefined or custom roles.
# argocd-rbac-cm ConfigMap
data:
  policy.csv: |
    p, role:admin, applications, *, *, allow
    p, role:dev, applications, get, develop, allow
    p, role:dev, applications, sync, develop, allow
    p, role:dev, applications, delete, develop, deny

    g, your.google.group@your-domain.com, role:admin
    g, jumpcloud-dev-group, role:dev
    g, user@your-domain.com, role:dev

  # Optional: Default policy for unauthenticated users or those not mapped to any role
  # policy.default: role:readonly
Explanation:
p,: Defines a permission policy., , , , g,: Maps a user or group (identified by their email or group claim from SSO) to a defined role.,
Ensure that the group names or email addresses you use in policy.csv exactly match the claims sent by Google or JumpCloud in the OIDC ID token.
Argo Workflows RBAC Example
Argo Workflows RBAC is controlled via standard Kubernetes RBAC. You'll create Role/ClusterRole and RoleBinding/ClusterRoleBinding resources, referencing the service account used by Argo Workflows. However, for users logging in via SSO, you typically map them to Kubernetes User or Group subjects within RoleBindings. This requires that your OIDC provider (Google or JumpCloud) passes user and group information that Kubernetes can interpret.
For example, if JumpCloud passes a group claim "argo-admins", you could create a RoleBinding like this:
apiVersion: rbac.authorization.k8s.io/v1
kind: RoleBinding
metadata:
  name: argo-workflow-admin-binding
  namespace: argo
roleRef:
  apiGroup: rbac.authorization.k8s.io
  kind: ClusterRole
  name: argo-admin # Or a custom ClusterRole you define for Argo Workflow admins
subjects:
- apiGroup: rbac.authorization.k8s.io
  kind: Group
  name: argo-admins # This name must match the group claim from JumpCloud
This approach allows for fine-grained control over who can create, manage, or view workflows based on their SSO-provided identity.
Troubleshooting Common Argo SSO Configuration Issues
Even with careful planning, issues can arise during SSO integration. Here are some common pitfalls and troubleshooting tips:
- Incorrect Redirect URI: This is a very common error. Double-check that the "Authorized redirect URIs" in Google Cloud or "Redirect URI" in JumpCloud exactly match
https://your-argo-url.com/oauth2/callback. A mismatch will lead to redirect errors. - Missing Client ID/Secret: Ensure the
clientIDandclientSecretin your Argo OIDC configuration are correct and haven't been truncated or mistyped. - Wrong Issuer URL: Verify the
issuerURL in Argo's configuration against your IdP's documentation or OIDC application settings. - Firewall/Network Issues: Ensure your Argo instance can reach the IdP's authentication endpoints (e.g.,
accounts.google.comoroauth.jumpcloud.com). - Scopes and Claims: If group-based RBAC isn't working, check that the
requestedScopesandrequestedIDTokenClaimsin Argo are correctly specified and that your IdP is configured to send those claims (especially group claims). - OIDC Debugging: Most IdPs provide logs for authentication attempts. Check Google Cloud Audit Logs or JumpCloud Directory Insights for errors related to your OIDC application.
- Argo Logs: Examine the logs of the Argo server (e.g.,