Deploy Azure Kubernetes Cluster using Terraform
— ny_wk
Ever felt the frustration of manually clicking through countless menus in the Azure portal just to provision an environment? Or perhaps you've faced the dreaded "works on my machine" dilemma when spinning up a new Kubernetes cluster? It's a common story, yaar. That's where Infrastructure as Code (IaC) comes into play, and specifically, deploying Azure Kubernetes Cluster (AKS) using Terraform is a game-changer. This approach automates your infrastructure provisioning, bringing consistency, speed, and reliability to your DevOps workflow, making your cloud deployments predictable and repeatable.
Mastering Azure Kubernetes Service (AKS) Deployment with Terraform: An IaC Deep Dive
Picture this: you're a junior DevOps engineer, fresh out of college, eager to make your mark. Your senior, an old hand who’s seen it all, offers you a cup of chai and a wisdom nugget. "Dekho, beta," he begins, "the days of clicking and praying are over. If you're serious about modern infrastructure, you need to understand IaC. And when it comes to provisioning complex setups like an Azure Kubernetes Cluster, Terraform is your best friend."
Why Infrastructure as Code (IaC) is Your DevOps Superpower
At its core, Infrastructure as Code is about managing and provisioning infrastructure through machine-readable definition files, rather than physical hardware configuration or interactive configuration tools. Think of it like this: instead of manually setting up servers, networks, and databases, you write code that describes your desired infrastructure state. Terraform, developed by HashiCorp, is one of the leading open-source IaC tools that enables you to define and provision cloud and on-prem resources using its declarative configuration language, HCL (HashiCorp Configuration Language).
So, why is this so powerful? Let's break down the advantages:
- Testability: Just like application code, your infrastructure configurations can be versioned, reviewed, and tested. This means you can run static analysis, integration tests, and even end-to-end tests on your infrastructure before it's deployed. No more 'fingers crossed' deployments, bhai! You can catch errors early and ensure your setup meets all requirements.
- Reproducible Environments: The bane of every developer's existence is environment drift. "It works on staging, but not in production!" With IaC, every environment—development, testing, staging, production—can be provisioned from the exact same codebase. This ensures consistency and significantly reduces discrepancies, making your setups 'bhasha mein' fully reproducible.
- Version Control with Git: Integrating your infrastructure code with Git (or any version control system) brings immense benefits. You get a complete history of changes, who made them, and when. This allows for easy rollbacks, collaborative development, and clear audit trails. If something goes wrong, you can pinpoint the exact change that caused it, aur phir 'rollback' kar do!
- Faster Deployments: Manual provisioning is slow, error-prone, and scales poorly. IaC tools like Terraform can provision complex environments in minutes, not hours or days. This accelerates your deployment cycles, allowing you to iterate faster and get features to market quicker. Less interaction with the cloud provider's UI directly means faster and more reliable operations.
- Reduced Human Error: Let's be honest, humans make mistakes. Typos, forgotten steps, misconfigurations – these are common when doing things manually. IaC eliminates many of these by standardizing the provisioning process. Once your code is vetted, it will deploy the same way every single time.
- Cost Optimization: By defining infrastructure explicitly, you can prevent unnecessary resource allocation and better manage your cloud spend. IaC helps ensure resources are provisioned efficiently and de-provisioned when no longer needed, avoiding 'wastage'.
When you combine these benefits with the power of Azure Kubernetes Service (AKS), you get a robust, scalable, and manageable platform for your containerized applications. AKS simplifies the deployment, management, and operations of Kubernetes, and Terraform makes provisioning AKS itself a breeze.
Setting Up Your Workbench: Prerequisites for AKS Deployment
Before we dive into the code, we need to ensure our local environment is ready for action. Think of it as preparing your 'chai-ki-kitli' before making tea. You wouldn't start without the right ingredients, would you? Here's what you'll need:
- An Azure Account: Obvious, right? You need an active Azure subscription. A free trial account works perfectly for this tutorial.
- Git: For cloning the repository containing our Terraform configurations. If you don't have Git installed, head over to git-scm.com.
- Azure CLI: The Azure Command-Line Interface is essential for interacting with your Azure subscription from your terminal. We'll use it for logging in and getting Kubernetes credentials. Install it from the official Microsoft documentation: Install Azure CLI.
- Terraform CLI: This is the star of our show. Download and install Terraform from the official HashiCorp website: Terraform Downloads. Make sure it's added to your system's PATH.
Once you have these installed, let's get you logged into Azure. Open your terminal and run:
az loginThis command will usually open a browser window for you to sign in. If it gives you a device login prompt (like the one mentioned in the source: microsoft.com/devicelogin and a code), just follow those instructions. Once authenticated, your terminal will show your subscription details, something like this (though with your specific IDs):
[
  {
    "cloudName": "AzureCloud",
    "homeTenantId": "ce1a0091-119f-4b04-8917-6170bd20e243",
    "id": "95798dc6-679a-4a59-914e-6d0d3bf79774",
    "isDefault": true,
    "managedByTenants": [],
    "name": "Free Trial",
    "state": "Enabled",
    "tenantId": "ce1a0091-119f-4b04-8917-6170bd20e243",
    "user": {
      "name": "your.email@example.com",
      "type": "user"
    }
  }
]
This output confirms you're successfully logged in to your Azure account. For production environments, it's highly recommended to use a Service Principal for Terraform authentication to ensure secure, automated deployments without interactive logins. But for a quick tutorial and learning, `az login` works perfectly.
Next, let's grab the Terraform configuration files. We'll clone a repository that contains all the necessary HCL code to deploy our Azure Kubernetes Cluster:
git clone https://github.com/nandlalyadav57/terra_aks_webapp.git
cd terra_aks_webapp
This repository contains the Terraform files structured in a modular way, which we'll discuss next.
Terraform in Action: Building Your AKS Cluster
Now that our environment is set up and we have the code, it's time to understand how Terraform orchestrates the deployment of our AKS cluster. This is where the real magic happens, dosto!
Understanding Terraform Modules: The Building Blocks of Reusability
One of Terraform's most powerful features is its support for modules. Imagine you have a complex blueprint for a house. Instead of drawing every brick and pipe on one giant sheet, you break it down into smaller, manageable sections: a blueprint for the kitchen, one for the bathroom, one for the foundation, and so on. That's exactly what modules do for your infrastructure code.
Modules allow you to encapsulate and reuse Terraform configurations. Instead of dumping all your resource definitions into a single main.tf file (which quickly becomes clunky and unmanageable for even moderately complex projects), you organize them into logical, distinct units. Each module can handle a specific task, such as creating a virtual network, setting up a database, or, in our case, provisioning an entire Kubernetes cluster.
The benefits are enormous:
- Reusability: Once you've created a module for a common resource pattern (e.g., a standard AKS cluster configuration), you can reuse it across multiple projects or environments with minimal changes. This promotes consistency and reduces code duplication.
- Abstraction: Modules allow you to abstract away complexity. A user of your module doesn't need to know the intricate details of how the AKS cluster is configured internally; they just need to provide the necessary input variables.
- Maintainability: Smaller, focused modules are easier to understand, debug, and update. When changes are needed, you know exactly which module to modify without affecting unrelated parts of your infrastructure.
- Team Collaboration: Different teams or individuals can work on different modules concurrently, accelerating development and reducing conflicts.
If you peek inside the cloned repository, you'll find a modules directory. Specifically, look at modules/cluster:
modules/cluster
├── cluster.tf
└── variables.tf
Here's what these files typically contain:
cluster.tf: This is where the actual Azure resources for the AKS cluster are defined. It will contain resource blocks likeazurerm_resource_group,azurerm_kubernetes_cluster, etc.variables.tf: This file declares input variables that the module expects. These variables allow you to customize the module's behavior without modifying its internal code. For instance, cluster name, node count, VM size, or SSH public key.- (Often)
outputs.tf: This file defines output values that the module will expose to its parent module or the root configuration. These could be the AKS cluster ID, its Kubernetes API server URL, or the public IP address of a load balancer.
This modular structure is crucial for managing the complexity involved in a complete AKS deployment.
Preparing for Deployment: Initializing Terraform and SSH Keys
Before Terraform can interact with Azure and provision resources, it needs to be initialized. This step downloads the necessary provider plugins and sets up the backend for state management. Run this from the root of your cloned repository (terra_aks_webapp directory):
terraform initWhen you run terraform init, Terraform inspects your configuration files (e.g., main.tf, which likely calls the cluster module) to determine which providers are needed. In our case, it will download the azurerm provider. It also sets up a local state file (terraform.tfstate) by default, which Terraform uses to map real-world resources to your configuration and track metadata. For production, you'd configure a remote backend like Azure Storage Account for shared and secure state management.
Next, for our AKS cluster to function correctly, especially if we're provisioning Linux nodes, we'll need an SSH key pair. This key is used for secure shell access to the Kubernetes nodes, primarily for debugging or advanced maintenance tasks. If you already have an SSH key, you can skip generating a new one. Otherwise, generate one:
ssh-keygen -t rsa -b 4096 -f ~/.ssh/id_rsa_aks -N ""The -f ~/.ssh/id_rsa_aks specifies the filename for your key pair to avoid overwriting your default id_rsa. -N "" creates a key without a passphrase, which is generally not recommended for production but simplifies things for a demo. For production, always use a strong passphrase and consider managing your keys in a secure vault like Azure Key Vault.
Once generated, we need to provide the public key to Terraform. The Terraform configuration is likely set up to accept the SSH public key via a variable. A common way to pass environment-specific variables to Terraform is by using environment variables prefixed with TF_VAR_.
export TF_VAR_ssh_key=$(cat ~/.ssh/id_rsa_aks.pub)This command reads the content of your newly generated public key file (id_rsa_aks.pub) and assigns it to an environment variable named TF_VAR_ssh_key. Terraform will automatically pick this up as an input variable for your configuration. It's a quick way for demos, but for real-world scenarios, leveraging Azure Key Vault to store and retrieve sensitive information like SSH keys is a much better and more secure practice.
Planning and Applying Your Infrastructure Changes
With Terraform initialized and our SSH key ready, we're on the brink of provisioning our AKS cluster. But before we hit the 'go' button, it's always a good idea to see exactly what Terraform plans to do. This is like reviewing your 'shopping list' before buying groceries, you know?
terraform planThe terraform plan command creates an execution plan. Terraform performs a refresh, checking the current state of your Azure resources against your configuration, and then determines what actions are necessary to achieve the desired state defined in your HCL files. It will output a detailed list of resources that will be added, changed, or destroyed. This is your chance to review the proposed changes and ensure they align with your expectations. If everything looks good – no unexpected deletions, no erroneous creations – then you're ready to proceed.
If the plan looks satisfactory, it's time to apply our configuration and provision the resources in Azure:
terraform applyThis command executes the actions proposed in the plan. Terraform will prompt you for confirmation (type yes) before making any changes. This interactive step acts as a final safeguard. Once confirmed, Terraform will start provisioning your Azure resources, including the resource group, virtual network, and the AKS cluster itself. This process can take several minutes (often 10-15 minutes or more for an AKS cluster), so grab another cup of chai and relax.
Upon successful completion, Terraform will output details of the created resources, potentially including the AKS cluster name or other key identifiers specified in the configuration's outputs.tf. This is a very satisfying moment, trust me!
Verifying and Scaling Your Kubernetes Workloads
Your Terraform deployment is complete, and your AKS cluster should now be live in Azure. But the journey doesn't end there! We need to verify that everything is working as expected and then deploy our sample application. "Abhi picture baaki hai mere dost!"
Connecting to Your Newly Deployed AKS Cluster
To interact with your AKS cluster, you'll use kubectl, the Kubernetes command-line tool. First, you need to configure kubectl to connect to your new cluster. This involves getting the cluster's credentials and merging them into your Kubeconfig file (usually located at ~/.kube/config).
Before that, let's ensure your Azure CLI is pointed to the correct subscription. If you have multiple subscriptions, it's a good habit to explicitly set the one you're working with:
az account set --subscription <YOUR_SUBSCRIPTION_ID>Replace <YOUR_SUBSCRIPTION_ID> with the ID you noted during az login or retrieved from the Azure portal.
Now, get the credentials for your AKS cluster. You'll need the resource group name where your AKS cluster resides and the cluster's name. If you used the provided Terraform code, the resource group is likely named kubernetes-resource-group (or similar, check your Terraform outputs or Azure portal).
az aks get-credentials --resource-group kubernetes-resource-group --name yourclusternameReplace yourclustername with the actual name of your AKS cluster. This command fetches the credentials and merges them into your kubectl configuration. It also sets the context to your new AKS cluster, meaning subsequent kubectl commands will target this cluster.
To verify that kubectl is connected and your cluster nodes are up and running, run:
kubectl get nodes -o wideYou should see a list of your AKS nodes, their status (hopefully Ready!), their internal IP addresses, and the Kubernetes version. If you see nodes in a NotReady state or no nodes at all, give it a few more minutes, or check the Azure portal for cluster health. This command is your first sanity check to confirm your Azure Kubernetes Cluster deployed with Terraform is operational.
Deploying and Managing Applications on AKS with kubectl
With the cluster verified, let's deploy a simple web application. The repository we cloned contains an azure-vote.yaml file, which defines a basic application using a front-end web app and a Redis back-end.
First, it's good practice to deploy applications into dedicated Kubernetes namespaces for better organization and isolation. Create a namespace:
kubectl create namespace myvoteNow, deploy the application using the YAML manifest. You can either apply the local file or directly from the GitHub URL:
kubectl apply -f azure-vote.yaml -n myvoteOR
kubectl apply -f https://raw.githubusercontent.com/nandlalyadav57/terra_aks_webapp/main/azure-vote.yaml -n myvoteThis command creates Kubernetes Deployments and Services for both the front-end (azure-vote-front) and back-end (azure-vote-back) components of the application within the myvote namespace. You'll see output confirming the creation:
deployment.apps/azure-vote-back created
service/azure-vote-back created
deployment.apps/azure-vote-front created
service/azure-vote-front created
To check the status of your deployed application components, use:
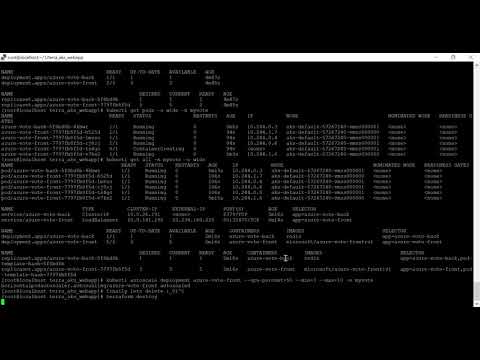
kubectl get all -n myvoteYou should see pods, services, and deployments listed. Initially, some pods might be in a ContainerCreating state. Give them a moment to pull their images and start up. Eventually, you want to see all pods in a Running state and 1/1 for their READY status.
NAME                                       READY   STATUS              RESTARTS   AGE
pod/azure-vote-back-5f8bd8b-4kbwr          1/1     Running             0          44s
pod/azure-vote-front-7797fb8f5d-v7kx2      0/1     ContainerCreating   0          42s

NAME                               TYPE        CLUSTER-IP      EXTERNAL-IP   PORT(S)         AGE
service/azure-vote-back            ClusterIP   10.0.26.191     <none>        80/TCP          44s
service/azure-vote-front           LoadBalancer   10.0.X.Y     <pending>     80:31765/TCP    42s

... (other resources like deployments, replicasets)
Notice the service/azure-vote-front. It's of LoadBalancer type. Azure will provision a public IP address for this service, which might take a minute or two to appear under EXTERNAL-IP. Once it shows an IP, you can navigate to that IP in your web browser to access the Azure Vote application. The service/azure-vote-back is a ClusterIP, meaning it's only accessible within the cluster.
Scaling Your Application
One of Kubernetes' most compelling features is its ability to scale applications dynamically. You can manually scale your deployments or configure horizontal pod autoscaling (HPA).
Manual Scaling
To manually change the number of pods for the azure-vote-front deployment, use the kubectl scale command. For example, to increase the front-end pods to 5:
kubectl scale --replicas=5 deployment/azure-vote-front -n myvoteRun kubectl get pods -n myvote again, and you'll see Kubernetes creating new pods to match the desired replica count. It's instant satisfaction, I tell you!
Autoscaling with HPA
For more dynamic and production-ready scaling, Kubernetes offers the Horizontal Pod Autoscaler (HPA). HPA automatically scales the number of pods in a deployment based on observed CPU utilization or other select metrics. Let's configure HPA for our front-end deployment:
kubectl autoscale deployment azure-vote-front --cpu-percent=50 --min=3 --max=10 -n myvoteThis command configures the azure-vote-front deployment to automatically scale. If the average CPU utilization across all pods exceeds 50% of their requested usage, HPA will add more pods, up to a maximum of 10. If CPU utilization drops, it will scale down to a minimum of 3 pods. This ensures your application can handle varying loads efficiently without manual intervention, saving you from 'late-night calls' during peak traffic!
And there you have it, folks! From setting up your environment to provisioning a full-fledged Azure Kubernetes Cluster using Terraform and then deploying and scaling an application, you've witnessed the power of IaC in action. This workflow is not just about convenience; it's about building reliable, scalable, and maintainable cloud infrastructure that empowers your development teams.
Key Takeaways
- Infrastructure as Code (IaC) is foundational for modern DevOps: Tools like Terraform allow you to define, provision, and manage cloud infrastructure through code, ensuring testability, reproducibility, and version control.
- Terraform modules enhance reusability and maintainability: Breaking down complex infrastructure into modules promotes abstraction, simplifies management, and fosters collaboration.
- Careful planning and validation are crucial: Always use
terraform planto review changes before applying them to prevent unintended modifications to your Azure environment. - SSH keys are essential for AKS node access: Properly manage and secure your SSH key pairs, especially for production environments, leveraging services like Azure Key Vault for security.
- Kubernetes tools (
kubectl) allow deep interaction: After deploying AKS with Terraform,az aks get-credentialsandkubectlare your primary tools for verifying cluster health, deploying applications, and managing workloads.
Frequently Asked Questions
What is the main advantage of using Terraform for AKS deployment compared to manual provisioning?
The main advantage of using Terraform for Azure Kubernetes Cluster deployment is the ability to automate, standardize, and version control your infrastructure. This leads to reproducible environments, faster deployments, reduced human error, and a clear audit trail of all infrastructure changes, far surpassing the limitations and risks of manual provisioning.
How do Terraform modules improve Infrastructure as Code practices?
Terraform modules significantly improve IaC by enabling reusability, abstraction, and better organization of your infrastructure code. They allow you to encapsulate common resource configurations, share them across projects, and abstract away complexity, making your HCL code more maintainable, scalable, and easier for teams to collaborate on.
Can I use an existing SSH key with my AKS cluster deployed by Terraform?
Yes, absolutely. When provisioning an AKS cluster with Terraform, you typically provide the public part of an SSH key pair as an input variable (e.g., TF_VAR_ssh_key). If you already have an existing SSH key pair, you can simply export its public key content to the relevant Terraform variable, and Terraform will use it to configure access to your AKS nodes.
How can I monitor my AKS cluster's health after deployment?
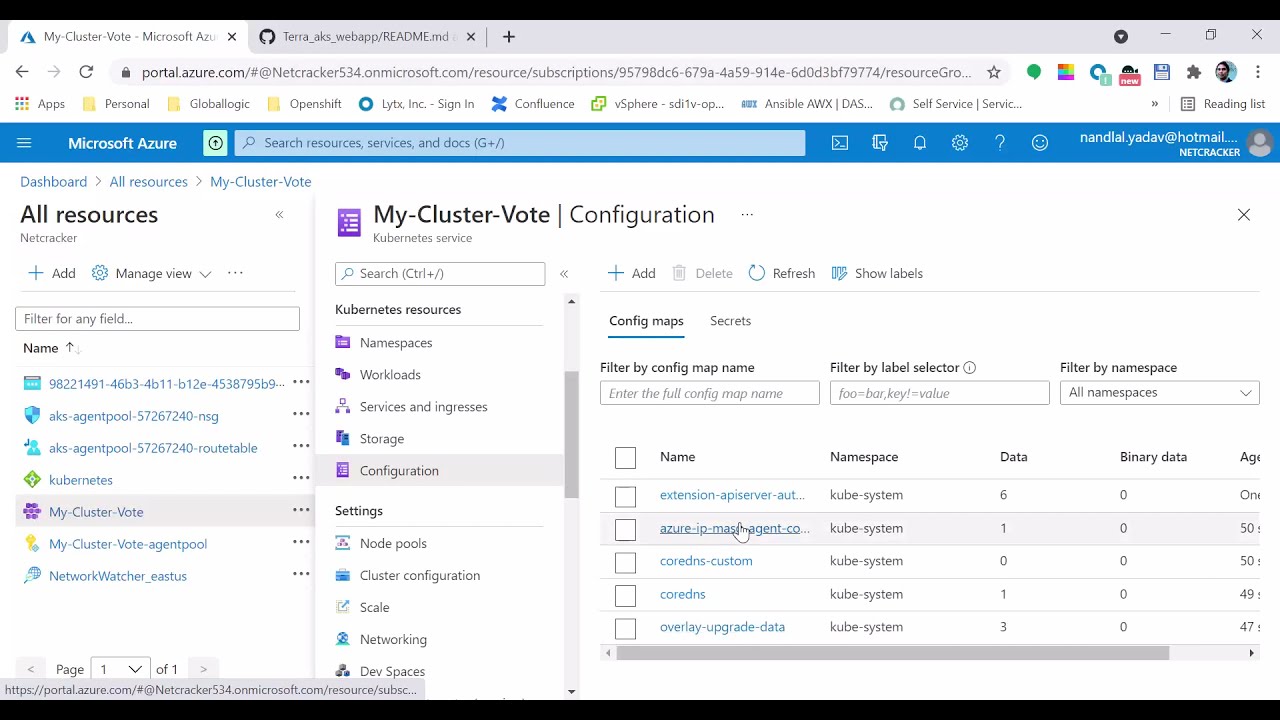
After deploying your AKS cluster, you can monitor its health using several methods. The Azure portal provides a comprehensive overview of your cluster's metrics and logs via Azure Monitor. You can also use kubectl get nodes for basic node status, kubectl describe node <node-name> for detailed node information, and integrate with tools like Prometheus and Grafana within your cluster for advanced, real-time metrics and dashboards.
And with that, our chai session on deploying AKS with Terraform comes to an end. This comprehensive guide should give you a strong foundation to start building your robust, automated cloud infrastructure. If you want to see all these commands in action and get a visual walkthrough, don't forget to check out the original video. It's always a good idea to see a practical demonstration!
Want to see this entire process live and learn more hands-on? Watch the original video on @explorenystream's channel and subscribe for more insightful DevOps content!